
If you have two drives, they must be configured as master and slave. Details of the link settings needed can be obtained from your drive supplier.
| Previous page | Contents | Next page |
|
|
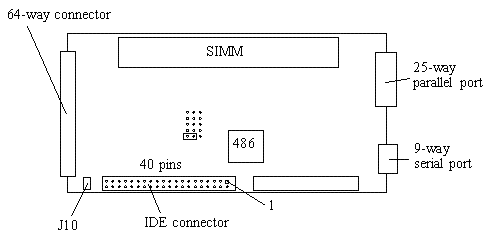
Expansion Cards permit up to two IDE hard disks to be connected
directly to the PC card itself. You may prefer to get your dealer to help
you install and set up this drive.
If you have two drives, they must be configured as master and slave. Details of the link settings needed can be obtained from your drive supplier.
|
|
To set up an IDE drive do the following:
|
| You may need to specify the option Start-up time for IDE
drives if your drive is slower to start up than average. (And if you have
a quick drive then you can probably reduce the default to save a bit of
time). This gives the time in tenths of a second that the PC card waits
on power up before trying to access the drive. This is because the drive
only starts to spin up the first time !PC is started, and it cannot be
used until it is up to speed.
If this value is too low then you may see error messages such as Drive
not working or No boot drive available before it boots, and
it may not boot at all.
The value must be a number between 0 and 140, that is, between 0 and 14 seconds. The default value is 21, that is 2.1 seconds. |
| It is possible to fit an LED to the PC Card via jumper J10. This allows you to set up a front-panel LED so that you can see when the drive is being accessed. Note that if you do this, the LED will always be on before !PC is run for the first time, and will only give a reliable reading when you are actually running !PC. |
| Aleph One Ltd. | 25-27 |
| Previous page | Contents | Next page |