Previous page Contents Next page
Using your PC Card

5.10 Installing the Aleph One Windows driver

The enhanced Windows Driver provides a substantial increase in speed for many common Microsoft Windows drawing functions, by using the ARM processor as a graphics coprocessor. It supports 16, 256, 32 thousand and 16 million colours in any resolution that your system can display. It replaces the standard VGA driver VGA.DRV. It also gives full palette support on Risc PCs. 
Note that the Windows driver cannot display modes beyond those normally available with your hardware. For example, Acorn computers older than the Risc PC cannot display more than 256 colours without additional hardware. Also the 256 colours supported are not the same 256 colours that a PC would have, so on these systems it is not always possible to reproduce colours accurately. 

The driver supplied is called ARMDRV.DRV. 

The driver can be installed: 

  • Using Windows Setup. For most users we recommend that you use Windows Setup, either during the initial installation, or after Windows is installed.

  •  
  • Manually, as detailed below. If you are an experienced Windows/DOS user then it is quicker to use the manual method, but you must be sure that your existing installation is for VGA (Version 3.0), otherwise you will have the wrong 386-grabber installed and your display will not work properly.
After installing the driver you need to use !PCConfig to specify the RISC OS mode that the driver will use. 

The OEMSETUP/INF file supplied with this version of the Windows driver has to assume a particular version of Windows when prompting for floppies. This version assumes version 3.11 (of both Windows and Windows for Workgroups). If you have a different version (3.1, 3.0, or 95), or even a version supplied by a manufacturer other than Microsoft, then some of the files required may be on different floppies (particularly vddvga30.386, which is on disk1 for v3.1, and disk2 for v3.11). 

If this is the case, insert the disk containing the requested file (shown in the bottom right of the setup screen), rather than the prompted disk. Setup will then proceed.

Using Setup when installing Windows

  1. Copy the ARMDRV.DRV and OEMSETUP.INF files to a dos format floppy disk, as detailed in Moving files between RISC OS and DOS on page 34. This disc will henceforth be referred to as the Aleph One Windows Driver floppy. 

  2.  
  3. Start to install Windows, using the Custom Installation option. 

  4.  
  5. When you get to the screen that displays your settings, do not choose the VGA(Version 3.0) display option. Instead, choose Other display (Requires disk from OEM)... from the bottom of the list.

  6.  
  7. Insert the Aleph One Windows driver floppy into the drive, as prompted.

  8.  
  9. Press Return to accept the default path of A:\, or type in the drive letter if you have placed the disk in a different drive.

  10.  
  11. Select the driver Configurable ARM Driver (4, 8, 16, 32bpp).

  12.  
  13. Continue with the installation, supplying discs as prompted.
  14. you may find that some files are not on the requested disk, but on a different one.

Using Setup after Windows is installed

You can change the display driver at any time by running Windows Setup either from DOS (with your Windows directory as the current directory) or from within Windows. You will also need to do this if you receive updated versions of the Windows drivers. 
 
  1. Open the Windows Setup program (it should be in the Main program group.
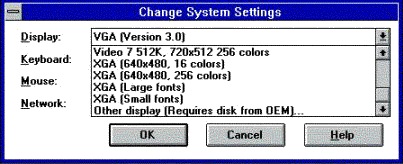
  2. Select Change System Settings... from the Options menu:
  3.  
     

  4. Click on the Display option to show the list of display options. Do not choose the VGA (Version 3.0) display option. Instead, choose Other display (Requires disk from OEM)... from the bottom of the list.
  5.  
     

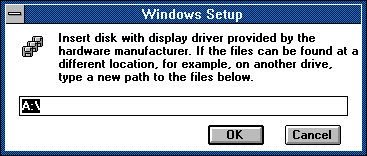
  6. A further dialogue box will appear:
  7. Insert the Aleph One Windows driver floppy into the drive, as prompted.
  8. Press Return to accept the default path of A:\, or type in the drive letter if you have placed the disk in a different drive.
  9. Select the driver.
  10. Continue with the installation, supplying disks as prompted.
  11. You may find that some files are not on the requested disk, but on a different one, as not all Windows releases have all the files distributed in exactly the same way(see above). If so, insert the disk containing the required file, rather than the specified disk.

You will have to restart Windows for the changes to take effect. 

Installation by hand

Note that you must have installed Windows with the VGA (Version 3.0) video option before doing this, otherwise DOS boxes in Windows will not work. 

To install the driver: 
 

  1. Copy the driver file (ARMDRV.DRV) into your PC's \WINDOWS\SYSTEM directory.
  2. Load the file SYSTEM.INI (in your PC’s \WINDOWS directory) into a text editor or SYSEDIT. 
  3. Find the line in the [boot] section which reads:
    1. display.drv=vga.drv 
       
    and replace it with the line: 
     
      display.drv=armdrv.drv 
To change the description as well as the driver (not necessary, but recommended) you also need to change the display.drv line in the [boot.description] section of the SYSTEM.INI file to: 
    display.drv=Configurable ARM Driver (4,8,16,32 bpp)

Aleph One Ltd. 39-42

 
Previous page Contents Next page